Getting Started With Your Fort
Prev: Exploring the Views || Next: Economy and DwarvesWe need to confront the cold, harsh reality of dwarf life. Dwarves need 3 things in order not to go insane and die:
* Food - grown from farms which need water or clay.
* Indoor beds - made from wood, which we get by cutting trees
* Alcohol - there are many varieties, but the easiest is beer brewed from plump helmets, which we brought plenty of.
Fortunately, our wagon is full of food and alcohol. If we start now, we can:
1) have woodcutter dwarves chop trees for lumber
2) carve out a rock wall in order to get space for beds
3) find some clay walls to carve farms out of.
We will do all of this by issuing orders, just as we did to get the wagon removed.
From the main screen, hit "d". This stands for "designations" and we use it to issue orders for dwarves to pick up at their leisure
.
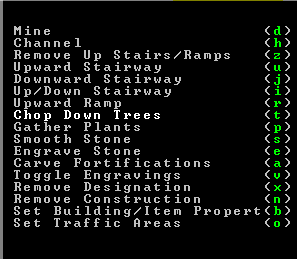
Let's start with mining orders to learn how designations work. From the designations menu, hit "d" again.
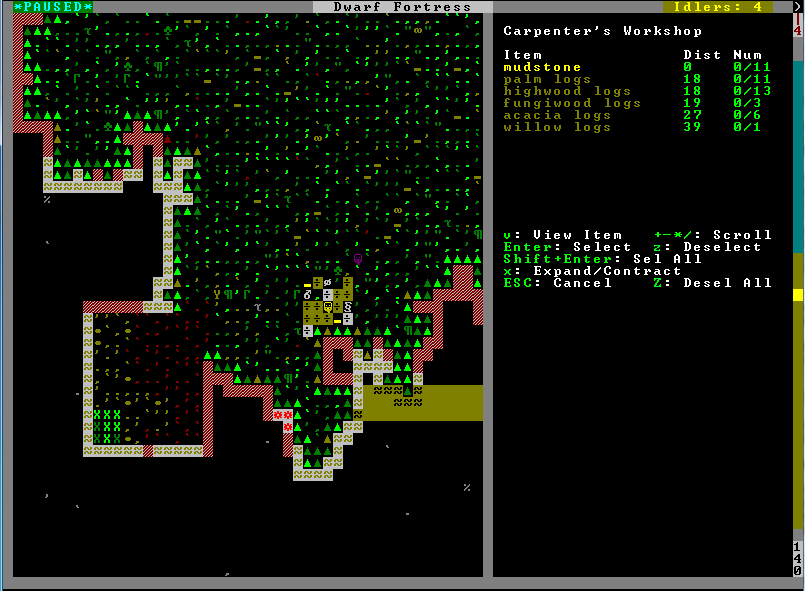
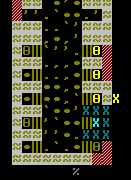
After you press "d" to get to the designations menu, the yellow X cursor shows up again. Press “d” to indicate we want to mine - in the menu, “Mine” should turn white in the sidepane to indicate it’s selected. When you press "enter", the yellow cursor starts drawing a rectangle with one corner at your starting point. This corner flashes with a green + sign. When you press "enter" a second time, that will be the opposite corner of the rectangle. As long as you have some rocks in your way (represented by the filled in blocks at the outer wall, and black space inside the wall) - they will be highlighted tan, thus marked for digging.
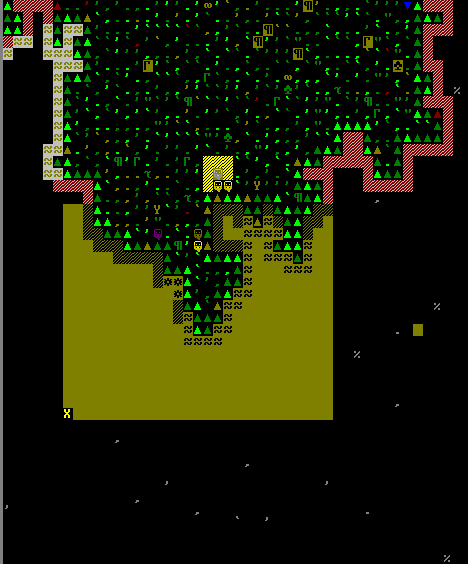
It should look something like this.
If there are some reddish walls (or walls you know are clay - use the "k" view!) - those will make for great farms, and you can mine through these walls faster.
PROTIP: You can make the cursor move faster by holding down "shift" - this makes it move by 10 spaces instead of one.
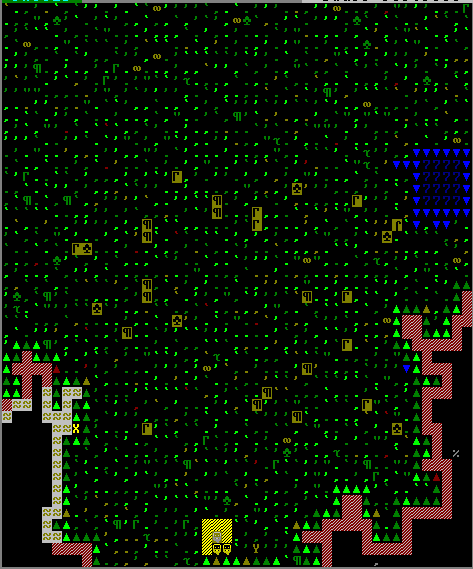
Now that we have some mining marked out, let's tell our woodcutter dwarves to chop down some trees. From the designations menu, press "t" - now “Chop down trees” should turn white in the menu. Draw a rectangle on the outside world. If you caught any trees within your rectangle, they'll also be marked tan. If you don't see any tan rectangles, then you probably don't know what a tree looks like! Try using the "k" tool, or drawing a much larger rectangle.
If you made any designations you want to undo, you can press "x" to draw a "clear designation" designation. When you paint this rectangle, it will remove any existing designations on this space, no matter what they are.
Okay! It's time to unpause and witness the havoc. Press spacebar and watch your little smiley faces run around. A few important things:
1) Dwarves with mining skills and pickaxes will do mining jobs. Dwarves with woodchopping skills and axes will do tree clearing jobs.
2) Each square you've designated counts as a separate task - and there's no way to tell dwarves to do tasks in a certain order. So, you will see some really erratic mining patterns. It'll get done, eventually.
3) Dwarves will stop working to eat, drink, or sleep. They have minds of their own, and their own priorities. It’ll all get done... eventually.
4) When dwarves are heading towards a designated job, the designated tile will flash to indicate it is being worked on.
After you watch your dwarves run around for a bit, you might want to pause and look around a bit to understand what's going on.
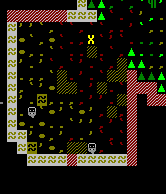
Hit the "k" button and move the cursor over to a place where your dwarves have finished mining. You'll see some places have a oval icon, and when you get the cursor over them you see something like this in the sidepane:
mudstone
mudstone cavern floor
What this means is that your miners left a rock (mudstone) sitting there on the floor (which is carved mudstone). These rocks can be used for building materials, or they can just get in the way of your other buildings. The type of rock is not super important right now.
If you look over to where a tree was, you can see a brown (or white or yellow, depending on the kind of wood) log icon. Put your look cursor over it and you will see "[tree type] logs". This is the lumber we need! Unfortunately, the sloppy woodcutters just left it laying around.
If you have mined out some clay, let's start off with placing a farm plot. From the main screen, hit "b" to build. Hit "p" to make a farm plot. We need to place this on our clay floor. You get an X to indicate the area of your plot and they're colored green to indicate it's on valid soil.. We want to make this as large as possible, even though we won't use all of it now. Hit "u" and "k" to grow the plot heightwise and widthwise until it stops growing. If the Xs turn from green to red, (for the colorblind: the side pane also spells out when there's an error) then use "h" and "m" to shrink it back until you no longer get an error. Now press enter - a farm! Your farmers will take care of this.
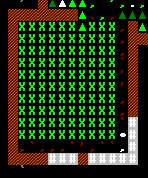
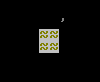
A planned farm

A finished farm
From the “b” uild menu, hit "w" to make a Workshop. “Workshop” is a category of building that requires workers and materials in order output various goods. We want a carpenter's workshop, so hit "c". Move the 3x3 grid of X's to a place indoors - it doesn't really matter where, yet. The light green X's on the building plan represent places your dwarves can walk through - dark green represents various ornaments that block access. Press "enter" when you're above a suitable spot, and the next thing you see is a list of building materials in the side pane.
Once again, you can scroll through using +/- to select an appropriate material. The list is ordered in terms of distance from your building. This doesn't affect the workshop much at this point, so you can just choose whatever's closest. Hit 'enter' again and you can see the plot and the new workshop flashing. Unpause to watch your dwarves build them.
Your farmer should run over to tend to the plot, and your carpenter will tend to the workshop. you might see the carpenter pick up stones and move them away from the shop - stones do block building placement, so he's just tidying up his area. After a few seconds, both will finish their construction - it's time to put these buildings to use!
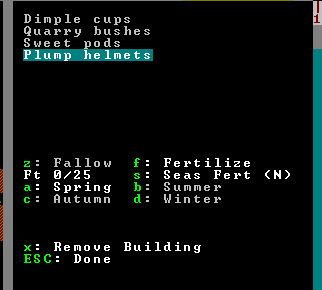
To give buildings orders, we need a new view - "q". Press it and move your cursor to the farm in order to give the farm orders. Farms take orders by season, so we need to give four different orders. However, we always want to grow plump helmets since they are both edible and able to be fermented into alcohol. So, hit "a" to select "spring", use + and - to get your cursor over plump helmets and “enter” to select them which turns “plump helmets” white, then "b" and plump helmets, then again for "c", and "d".
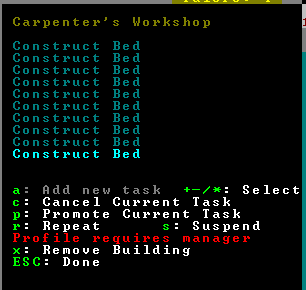
Now, move your "q" cursor over to the carpenter's shop we made. We will press "a" for "Add new task". Then "b" for "bed". You can press "a" and "b" in quick succession to add several jobs. We'll probably run out of wood before we get enough beds for our dwarves. Once you're done, you will see the farmer run to the farm holding a plump helmet seed, and the carpenter run to a piece of a lumber and bring it to his shop. Dwarves carrying items will flip between the dwarf icon and the icon for the item they’re carrying.
=-=-=-=
At some point around this time, your dwarves will probably become thirsty and hungry. This is indicated by downward arrows of various color on their person. You can view person to see what conditions they have. When they are hungry or thirsty, they will stop work to run to the food and alcohol sections of your fort - which right now is the site of our deconstructed wagon.
=-=-=-=-
Now we've got food planted, beds being prepared, and plenty of alcohol. We're doing great! It's time to start thinking about giving our dwarves their own rooms. Designate some mining in this general pattern:
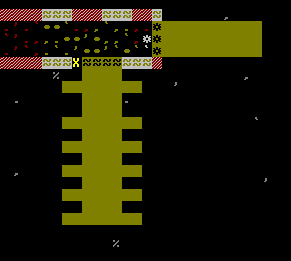
The thick center is a hallway. The small one-tile-wide, two-tiles-deep things coming off the hallway will become bedrooms.
Once those spaces are mined out, we need to place our beds - we do this through the build menu. So hit “b”uild, then b again for "bed". Place it in the recessed hallways you've created. A material screen shows up but you can just press enter quickly and ignore it - we don't care which bed goes where. The white background indicates a pending installation - once it’s finished, the white will go away and we’re left with the actual bed (whose color will vary based on the color of the wood used to make it)
You can place a lot of beds quickly by pressing "b" enter enter, moving the cursor, "b" enter enter, until you run out of beds.
Installing these beds is a "haul" job since we're just moving things around. All dwarves have hauling turned on by default, so this gets done quickly.
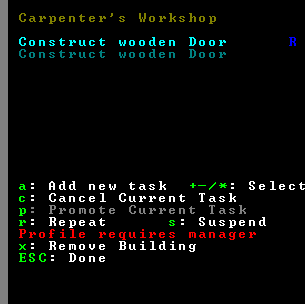
Next, let’s make them some doors so they can have some privacy. Cut down some more trees - from the command menu “d”esignate “t”ree removal - and then go over to our workshop and hit q to view it, “a”dd a task, and make a “d”oor.
Press "r" to toggle "repeat" on the job currently selected. When a job has "r" next to it, that means when it's completed it is not removed, but goes to the bottom of the queue. You can turn "repeat" off by highlighting it with +/- and pressing "r" again.
You can also press “c” to remove the currently selected job. If you ever want to change a job order, you can press "p" on a job to move it up the list.
You know, it's really inefficient that we have some dwarves doing nothing, while our carpenter is running around collecting wood instead of making doors. We can fix this with a stockpile. Basically, a stockpile is an area that the dwarves stock everything in. Because moving things around is a hauling job, every dwarf will pitch in to keep your fort organized. Press "p" to go to the stockpile screen, and press "w" to create a wood stockpile. place it close to your carpenter's shop so they don't have to go far for materials. Now your carpenter spends almost all his time in his shop, making furniture!
=-=-=-=-
at this point your dwarves are probably tired (white arrow flashing). They'll run off to the nearest bed and take a nap. If you didn't have beds, they would sleep outside and be quite grumpy as a result. Aren't you glad you made beds now?
=-=-=-=
While you're waiting for your doors to finish, your plump helmets should be pretty close to ready. Carve out some space indoors near your farm, and "p" to stockpile, "f" for food.
When your doors are ready, from the command menu “b”uild, “d”oor. You can hit "d" enter enter, move cursor, "d" enter enter repeatedly to get it done really fast. Place the doors between the bed and the hallways.

We're not quite done with the bedrooms yet. Hit "q" and go to a bed - you see that option "r: make bedroom"? Dwarves are happiest when they have private rooms, so for each bed we need to hit "r" and then "enter" to create a "room". The doors help us by giving the room a natural limit - otherwise we'd need to manually resize each room to fit within the tiny space we've allocated. (Why such a tiny space? because dwarves don't care, right now! - and we can always expand it, later).
Once you've done this, you can see if you have enough beds by using "q" to see if the room has been claimed. If a dwarf's name is on the room status screen, a dwarf has claimed it. If you have a lot of unclaimed beds, you have enough bedrooms. If not, you might want to build some more.
Okay, now it’s time to get fancy. Let’s start by designating some staircases. Hit “d”, then “I” to create an up/down staircase. Now find some stone wall (like you would mine) and mark out a 2x2 area for stairs - make sure your miners have a clear path to the designated staircase area!
If you can't find any stone walls, you can also build stairs - hit "b", capital-"C", and "x" to build a staircase out of available material. In the steps below, if there is still no stone wall underneath you replace the designation step with this construction step again. If there is stone underneath you, you can follow the instructions as-is.
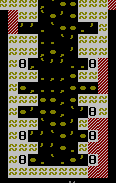
Let the miners do their magic.You end up with something like:
on your screen (the bottom two of my 2x2 set of stairs is currently obscured by the rocks on top of them. oops.)
Now, keep a careful eye on those stairs. Press “>” (you probably need to hit shift-period for this).
EVERYTHING CHANGED.
Okay, so pause for a second and stop worrying. Dwarf Fortress has three dimensions. Besides the 2d map you started on, you can also press > or < to go down or up a “layer” - the third dimension is the result of all these layers stacked on top of each other. Don’t worry about it too much right now - the important part is, when we carved out stairs, if there was rock below the space we designated, the stairs get “marked out” and the stone is revealed.
Now we need to designate another set of stairs on those revealed blocks so dwarves can go down and get back up. Do the same designation - “d” then “i”. If you need to look at the previous screen where you kept everything before, press “<” to pop back up a layer. Try popping back and forth a few times just to get the hang of it. If you see any of those upward facing slopes, pop up to look at how the land looks above you and imagine what the cliff face you’re burrowing into looks like in three dimensions.
If you ever get lost, press F1 to jump back to your arrival point.
So, now we’ve taken care of our most immediate concerns. We’ve got our farm plots up and running, we’ve got beds for our dwarves, and we have the beginnings of an economy. Next, let’s learn about some advanced tips to keep your fortress nice and organized, and then explore how to continue to build an economy - and keep your fortress safe.
Prev: Exploring the Views || Next: Economy and Dwarves