Economy and dwarves
Prev: Getting Started With Your Fort || Next: Homefort SecurityEvery year, a trade caravan passes through your area. They carry various goods that might be difficult to obtain. In order to utilize a caravan, though, we need two things. Most importantly, we need a trade depot.
The depot needs to be “Accessible” - it needs to have a 4x4 path to the edge of your map. Find a suitable location and hit b to build, then “D” - as in, shift + d. Select materials as usual.
The depot is a special building in that it needs a dwarf with an Architect job to come look at it. This is a good time to learn how to set jobs. “v” to find a Dwarf who isn’t going to be doing anything important for a bit, and hit “p” to go into the Preferences menu. From here, press “l” to go into the labor menu. Press +/- to get to “other jobs”, press Enter, and press “Enter” to toggle Architecture on. It turns white. This means your dwarf will now take Architecture jobs.

All dwarves can learn all skills - the “v”iew “g”eneral tab lists jobs they’ve tried at least once. If they’re trying something for the first time, they won’t be very good at it. This will be indicated by the adverb preceding the skill job - for a first timer, it will be “dabbling”. For an expert, it will be “Legend” -- wait for it -- “dary”. Experts might do their job faster - an expert miner will blow through walls like nobody’s business - or they might do it better. Items that you create - in our architect’s case, he’s creating a building - have “value”. This value is partially determined by the value of the materials that go into it (gold has a higher value than random rocks you’ve been making buildings out of), but also by the skill of the architect. Value doesn’t come into play until later in the game, though, so don’t worry about it for now.
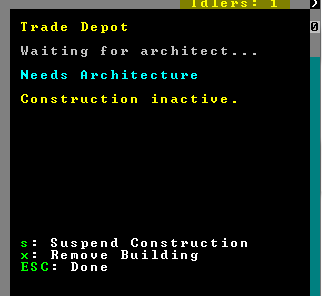
While we’re waiting for our architect to get his shizz together (You can look at the building under construction with “q” and see it’s status is “Waiting for architect...” - remember, dwarves have minds of their own, and don’t always do all jobs instantly), let’s work on another essential part of our fortress. We need a dining room where dwarves can hang out, party, and eat at an actual table instead of hunched over a barrel in the stockroom. For a dining room, we need tables and chairs - both of which can be constructed out of wood. However, there’s another, cheaper way to make tables. Let’s build a stone workshop.
Find a good place for another workshop - 3x3 will do it. After your miners finish carving it out, hit “b”uild, then “w” for workshop. “m” for Mason’s Workshop will do us quite nicely. We’ll also need to designate a Stoneworker dwarf - “v”iew a dwarf, go to their “p”references, and press enter over Stoneworking and toggle on Masonry.
Once the workshop is built, “q” to view its queue and “a”dd a “t”able. Add 3 or 4 to seat everyone. Hop over to your woodworking shop and “a”dd “c”hairs - one for each dwarf is enough.
Around this time the game might pause and jump views to some crazy place with a message: “Migrants have arrived!”. Dwarves will show up and join your population. Sometimes they come with high skills and good equipment. Sometimes they just show up and start eating your food. You can hit space to unpause and F1 to jump back to your fort’s entrance. You can “v”iew the migrants and once they stop flashing “X” (which indicates they are a new arrival) you can set their labor patterns like any other dwarf.
Don’t forget to carve out new bedrooms for your migrants! Remember, bedrooms are created by 1) building a bed from wood, 2) building a door from wood or stone, 3) placing the bed and the door, 4) using “q” to designate a bedroom from the bed with “r”.
While we’re building workshops, you should also build a Still (hotkey: l, as in lemon). In the early stages of this tutorial we should have designated a brewer already, but in case you need another: “v”iew a dwarf and change his “p”references to include Farming/Related -> Brewing. Once we staff this, it will take in various raw foodstuffs and output alcohol. However, in order to output alcohol, we will need to build wooden barrels to hold it. (Hotkey from a wood workshop “q” view, "a"dd, “v” for... bavvevl. I don't know why it's "v".).
Once you have some barrels (they look like division signs), use "q" to “a”dd a bunch of “b”rew jobs to your Still.
Anyway! Once your table is finished, “b”uild a “t”able. Place the tables in a nice big room. Surround the tables by “b”uilding “c”hairs.

“q” to building-look at your placed tables - put your cursor right over a table if you keep getting chairs instead. Press “r” to make a dining room. Press “+” or “-” to size the flashing blue blocks and press enter when you’re done. Press “h” to make this a meeting hall as well - now your dwarfs will take dinner down here and eat, or hang out here when they're bored.
Oh hey, is your depot done yet? If so, from the main screen, press capital “D”.
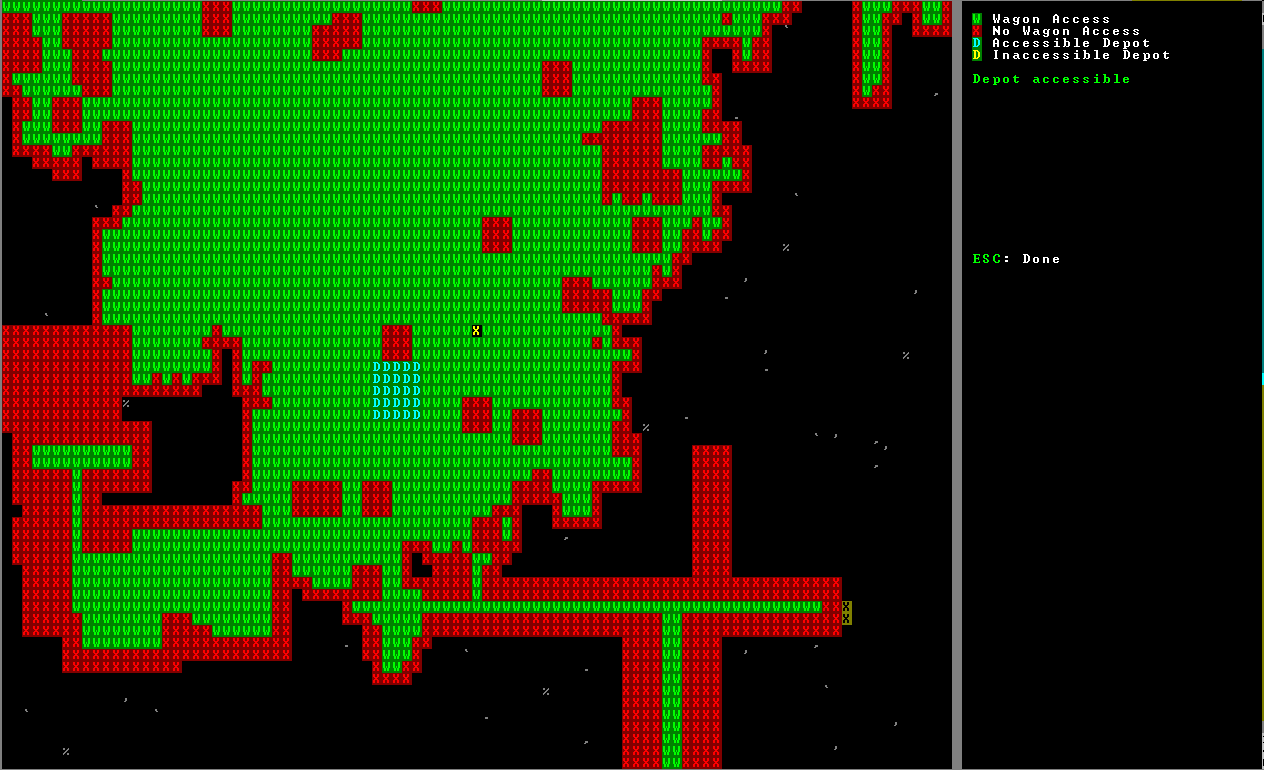
Crazy colors are flashing! Holy shit!
Okay, first off, see in the right hand pane, “depot accessible”? And see how your depot is now a bunch of capital teal “D”s? That means my depot is accessible. The green just shows all paths that have four spaces of clearance, and the red means the terrain is not accessible to depots. Hopefully your depot is accessible! If not... fuck! You fucked up! Look at the red bits and if they're trees, use "d"esignate "t"ree removal to chop 'em down. If they're little infinity signs, those are boldors and you need "d"esignate "s"mooth stone to remove them (and someone with the masonry -> "stone detailing" labor preference - again, set that by using "v" to find a dwarf, "p"references, "l"abor).
Okay. Let’s clean up a bit. We’re going to create a few new stockpiles, so you might want to mine out some big rooms. While your dwarves do that, we’re first going to create a stockpile outside. Find a nice clear area, and hit “p” for stockpiles. Designate a large area, and once you hit enter press “r” for “refuse”.
Garbage - particularlly dead animals any cats might kill - will rot. Rotting garbage creates purple clouds of shit (“miasma”). Designating this stockpile means garbage will be taken outside, where it dissipates safely.
While we’re outside, we’re also going to use “zones” to clean up our fort a bit. from the command menu, hit “i”, designate a large space, and hit “g” for “garbage area”. Now, you can loo“k” at stones flashing on top of furniture, and hit “d” to dump that item - which tells a dwarf to carry it out and throw it in the garbage area. While you’re creating zones, if you see water on your map (preferrably in the form of a river), create a zone including a bit of water and a bit of land and hit “w” and “f” to mark it as a “water source” and “fishing area”. Dwarves only drink water when the alcohol’s gone - or when they’re tending to an injured dwarf. Fishing area should be pretty self-explanatory - all it needs is a dwarf with a fishing labor turned on, but don't worry about assigning a dwarf to this job if you don't have a Fisherdwarf already. It's time-consuming and there's still a lot to do!
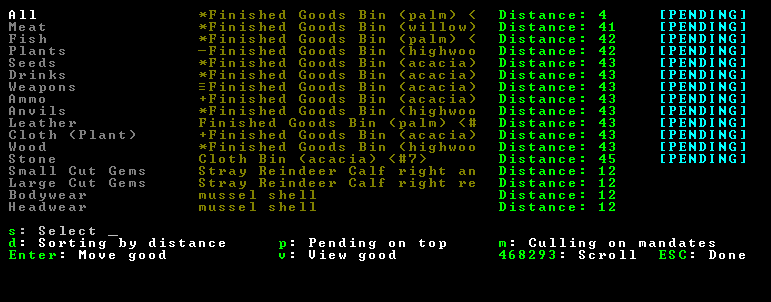
Now, in one of the large areas you cleared out, create a new stock“p”ile and press “u” to designate it for furniture. This will put all your barrels, tables and chairs into a central place for easy retrieval. If your stockpile is almost full, go ahead and create a new one right next to it.

So, hey, how much stuff do you have? No idea, right? There’s a solution!
Press “n” to see the administrators and nobles screen. Scroll down to “broker” with the arrow keys and press enter. Select a dwarf who has minimal use to you. Do the same thing, with the same dwarf you just chose, for “bookkeeper”. You’ll see a red “REQUIRE” next to their name. Press enter again to see their needs: a “ meager office” in red and “ meager quarters” in blue. The quarters are blue if you have enough bedrooms. An office is made from a chair, like bedrooms are made from beds and dining rooms are made from tables. “Meagre” is a value description - in this case, minimal value is fine. The value of a room depends on the value of the furniture in it, but also it’s size - in this case we can make do with a 2x2 room, but feel free to make it larger. Place a table, chair and door in there. Press “q” and look at the chair, and press “s” to make a study. Now press “a” to assign it to the dwarf you made into your broker. If you press “n” again once you’re done, you can see “REQUIRE” is no longer red, indicating you’ve fulfilled the broker’s needs.

Your broker dwarf is now colored purple to indicate his profession. Hit “n” one more time to get back to the Nobles menu, and scroll back down to the bookkeeper tab. Press “s” and use the arrow keys to scroll all the way down to “highest precision” and press enter, then “Esc” to exit.
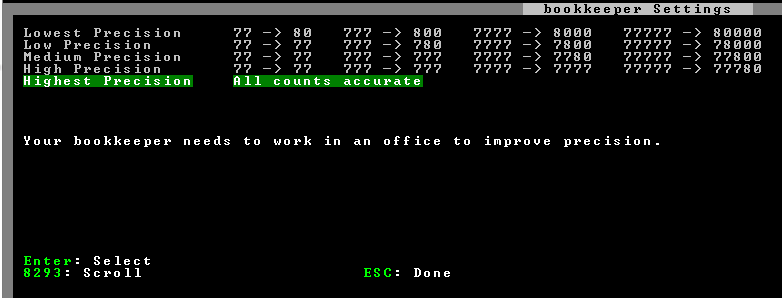
Now when your bookkeeper's office is done, he’ll spend all his time in there gaining skill in “record keeping”. Once he’s been there for a bit, you can press “z” for “status” and get a rough count of how many supplies you have. As your broker’s apprasial skill goes up, his accuracy improves!
Hopefully, at this point, you are feeling a bit more comfortable with the interface and how to do things. We’re not quite through yet with all that’s needed for a successful fortress, but we’re getting there. Let’s build a craftdwarf’s workshop (“b”uild, “w”orkshop, “r”) and a jewler’s workshop (“j” in the workshop list). Next time you get a migrant wave, go to your dining room/meeting hall (where new migrants gather) and set some of their skills to jewelry (cutting and setting) and crafts (stonecrafting and bonecrafting are good).

Jewels are the star-looking things you find while mining. Jewlers polish them and set them in crafts. Crafts are tchotchkes - their only purpose is to generate value, so you can trade them to caravans in exchange for food and beer. In the craft workshop, add a job to create rock crafts and put it on repeat with “r”.
You’ll want to head over to your carpenter shop and add a few jobs to create bins as well (“n”) since bins store crafts more efficiently (like barrels do for food). You’ll also want to create a stockpile for finished goods close to your trade depot. Finally, create a stockpile next to your jeweler’s shop for jewels. Like the very first stockpile we created for wood, this means your jeweler doesn’t have to go too far.
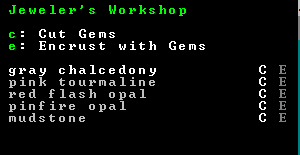
To use the jewler, press “a” to add a job. There is a list of available gems below the “c”ut and “e”ngrave tasks. You can scroll through gems with +/- and then press “c” to cut those gems. Create a cut job for each gem type you have, then scroll through your list of jobs in the workshop with +/- and put each one on repeat. When you run out of gems, the jobs will be cancelled.
So when the caravan arrives - and hopefully it should be here soon! - use “q” on your depot and hit “r” to request your broker to show up and start negotiating. Then hit “g” to select goods you want to trade.
Mostly you’ll want to use the arrow keys to scroll down to “finished goods”, then press right and just press enter on every single item. It’s a pain, I know. Witness the frenzy as every dwarf pitches in! Witness the weird shapes now walking around your map! Wait for them to get into place, then we can start trading. You’ll get a message on the bottom of the screen:
“Merchants have arrived and are unloading their goods”
(By the way, you can press “a” to see all announcements made)
Once you get that message, and you see your broker standing in the center of the depot, move a “q” cursor over to your depot and press “t” to start trading!!!
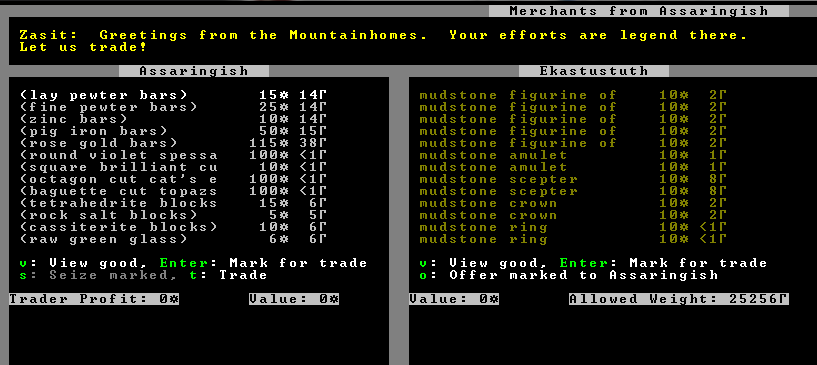
Okay! So, the stuff on the left is the trader’s items. The star symbol indicates value - as your broker gets more skilled at apprasial, these values will become more accurate. The weird T thing is weight. The caravan has a weight limit you can’t exceed. You’ll see below the listing is “trader profit” - traders want to make a profit, obviously. Next to that is the value of goods they’re giving you, and on the right side of the dividing line is the value of goods you’re offering.
What you want to do is press the right arrow key to go over to your column, and press Enter on every single item to mark it all for trade. A “[T]” appears next to marked items. When items are in bins, they show up below the bin slightly indented and you can either mark the bin (which implicitly marks all items in it) or just the individual items, if you want to keep the bin and not the items in it.
Now, press left to go back to the trader’s side, and scroll down. We’re looking for plump helmets or plump helmet spawn (the seed created after dwarves eat or brew plump helmets). Press “enter” next to any spawn you find to mark it for trade, and note the value accumulation at the bottom. If you go over, unmark items until the trader is back to making a profit. If the trader is making TOO much off you, though, feel free to find some alcohol (it’s easy to spot - look for words like “rum”, “wine”, and “beer” - but stay away from “ichor”) and add it to balance out your books. You'll want to end up with the trader making about 1,000* in profit, but that's not an exact figure.

Once you’re done marking, press “t” to complete the trade. The trader will probably be a bit of a jackass to you, as you can see at the top of the screen. Unmark more of the trader's goods (protip: use page up or page down to move through the list faster!) until they accept your offer - but if you make too many unpleasant offers, the merchant will quit in a huff. Hit “q” and view the depot, and press “r” to free up your broker - once the merchants leave, your dwarves will automatically start hauling your bounty back.

Once the merchants are about to leave, you’ll get a weird window pop up with a request to meet. Hit “esc” to leave the first time. When you’re asked to make a list of things you want:
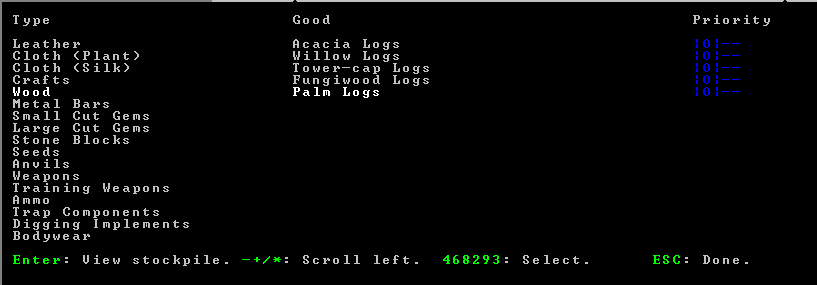
This screen is BACKWARDS. Use +/- to change the categories on the left, and up/down to select an item in the middle. Use left/right to set priority - more to the right means higher priority. This will bring more items of that type in the next caravan. I tend not to screw around with this early in the game, since I just need stuff that will already be on the caravan.
One last screen will eventually pop up. This is what the caravan wants from you, and they’ll pay extra for it. It’s not essential.
So! You’ve survived your first year, hopefully. now it’s time to start looking at some security measures you’ll probably need to take at some point.
Prev: Getting Started With Your Fort || Next: Homefort Security